Saturday, March 26, 2011

Working on editing diagrams and class documentation

This week, I put my energy on editing the class diagrams and class documentation according to these new changes on the rendering engine side in the past couple of weeks.


Class documentation has been revised as well. A xml formater will later help produce nice looking docs on the design of the rendering engine part.

Some fixes on the rendering engine and it's almost the finalized version of the engine

Some updates and fixes on the engine:
1. The engine is now running by default on fullscreen, it's now able to fetch user's machine resolution and configure to fit this resolution to get a best looking of the interface and rendering area.

2. I have made changes on the editing word coordinator axes. It's now much elegant than before, which has got a cone head and thinner sticks, making it easy to select as well.

3. The first two editing ball will be shown to indicate that the user has successfully add the first two control points.

Working on updating the rendering engine and communicating with other group members

I think this email sending to all group members would be diary to show what I'm doing this week ---

Hi all,

While I'm working on updating the rendering engine and doing some fixes on it, some important things to say again.

1) Please forgive me to say it again: each of us should at least post 6 diaries by week 6.

2) I will upload the "almost finalized" version of our rendering engine tomorrow. The engine will by default run at fullscreen mode, as Luke wants, it will be smart enough to know users' machine resolution and configure to fit it. If user presses Alt + Enter key, the engine switchs back to 1280 * 800, a classic safe resolution that fits most of machines.

3) The rendering engine now will show a control point ball for first two points to let users know they have successfully add the first two points before we render a knot string starting from third point.

4) Jernej, the size of the button bar for you is determined to be 180 * 800.

5) Phil, the updated engine has been implemented with the XML and database code. Besides this, I have made examples for you to insert button related code so that you do not have to worry about those hard things, such as the alpha blending & rendering state. My intention is to save your time and make things easier for all of others. All code between the comments, // for buttons & // end of buttons, is the implemented button related code. The button framework I used is from a famous xna tutorial: http://alecjacobson.com/games/button-tutorial/   http://www.alecjacobson.com/weblog/?p=539 . This button framework has implemented the Up, Over & Click event handling and color changing. Not only that, it has a very nice advantage that it can recognise if your mouse is over or click the irregular textured area and left other transparent area static. This will be very nice feature for you to draw buttons on the top of Jernej's rope-wood ladder. Hope you will like it.

6) I don't think we need to draw a menu like button bar at the top of the rendering area. As talked to Luke, we only need to draw the essential & important buttons on the right hand side. For those minor operation and short keys, we could simple document it in the user manual.

7) So, what is the next most important thing? We need to look into Jernej's work, check to see how many buttons we could have. We need to make the decision: if we only draw 15 buttons, then which buttons are at this high priority. To work it out, I appeal, each of us, while you are testing and playing around with the rendering engine, please list 15 buttons that you think need to put on the button bar. Please send it back to Tim and CC to other group members by Thursday. So that we can disccuss and make final decision with Luke in Thursday meeting.

Kind regards,
Jun

Friday, March 18, 2011

More mouse event handling

Today, I was working on adding more mouse event handling to the rendering
engine, so that the operations using mouse can be much more elegant. Left
click remains the same to do add pints, slecet a control point, and all other
basic operations as usual. The middle mouse wheel scroll is to move a camera
(zoom in or zoom out). Its drag & drop is now being used to move camera to
four directions, Up, Down, Left, and Right, which is same as the operations
using Up, Down, Left and Right arrow key. The right mouse button drag & drop
is now used to rotate the knot objects in the scence.

User interface testing

To test if our rendering engine is robust enough and check to see what kind of
user interface is good to create, this week I'm working on testing a user
interface. I decided to draw buttons on the right hand side as it looks nice
and needs less changes on the engine code. Each view has now got a text to
indicate which view it is. I think we should have a status bar at the bottom
of the knot rendering area. Three buttons are drawn for the testing: Select,
Add points, and Delete.


Database stuff and XML

Today I worked with Allen to add the abilities to our rendering engine to
allow saving snapshots to a local xml file and uploading snapshots to an
online database server. Allen's own framework in web programming is impresive.
It has made my life easier. Simply add the compiled framework dll files,
create PointModel, StepModel, LineModel, and KnotModel, corresponding to the
control point, a snapshot, a string, and a knot in the rendering engine. It
can then easily serialize the data to be xml form and database stuff, then
save it, upload it. The deserialization, as well, very easy and nice to use.
Currently, press L key is to save the snapshots and K key is to load a set of
knot snaphots in run time.

Texture changing & Snapshot traversal

In yesterday's meeting, Luke wanted us to improve the 3D knot rendering
engine, mainly two things: 1. to allow user to change the texture of the
strings; 2. when in the snapshot mode, an user should not only be able to play
the animation to see how a knot is tied, but also be able to walk through each
snapshot one by one forwardly and backwardly. 4.5 hours of work today, I have
implemented these two functionalites on the engine.


Today's meeting was the first meeting with Luke in this semester. I
demonstrated what I have done during summer vacation to Luke. We already have
a 3D rendering engine that can render 3D strings and those API's have been
provided for writing further user interface. They all seemed very happy with
what I have done for the project. Basic functionalities and operations of the
knot rendering engine are described as bellow ---

Add A New End Control Point Uing A key: while holding on A key, left click on
the screen; It adds a new control point at the end of the string. When there
are more than three control points, the program starts rendering the string.
Show Editing Ball Using S key: Press S key to toggle on or off showing the
editing balls on all control points.

Delete A Control Point Using D key: When the control balls are visible, a left
click on a control ball will select this ball. The ball will become red and
the X, Y, Z coordinators will appear on the ball. At this moment, press D key,
this selected contorl point will be deleted.

Add A New Internal Control Point Uing E key: To add a new control point
between two existing control points on the string. Left click to select one
control ball, holding on E key, continue to select next control ball using a
left click. Two selected balls will become red. Then release the E key, press
the E key again, a new control point will be added and a new control ball will
be drawn at the position.

Move A Control Point Using Left Click, Drag & Drop: When a control ball is
selected, the coordinators are shown, a left click on the X, Y or Z axis will
select that axis and the axis will become white. At this moment, a drag & drop
on different directions will move the control point to a new position.
Make A String To Be A Closed String Using G key: Press G key, it joins the
start point with the end point making a string to be a closed one. Press G key
again, it makes it back to be open one.

A Undo Using [ key: Press [ key to make a undo, being one step back in the
editing history. The editing history is unlimited recording all editing steps.

A Redo Using ] key: Press ] key to make a redo.

Toggle Wireframe Mode Using F key: Press F key to toggle on or off the
wireframe display mode.

Reduce The Radius Of The Strings Using - key: Press - key to reduce the radius
of the strings. It has a minimal radius restriction.

Enlarge The Radius Of The Strings Using = key: Press = key to enlarge the
radius of the strings. It has a maximal radius restriction.

Switch Between Two Strings Of A Knot Using R key: Press R key to activate
another string of the knot. It switch to working on this active string and the
previous one becomes inactive.

Put A Tree Frustum Into The Scene Using T key: Press T key to put into or take
out from the scene a tree frustum.

Put A Hanger Into The Scene Using Y key: Press Y key to put into or take out
from the scene a string hanger.

Rotate The Scene Using X Key And Drag & Drop: While pressing the X key, a drag
& drop in different direction will rotate and scene.

Pan Camera Using Arrow Keys: Holding on left, right, up and down arrow keys
will move the scence in four relative directions.

Zoom In or Zoom Out Using Mouse Wheel Or Page Up & Page Down Keys: Scrooling
the mouse wheel or holding on Page Up or Page Down key will do zoom in or zoom
out camera operations.

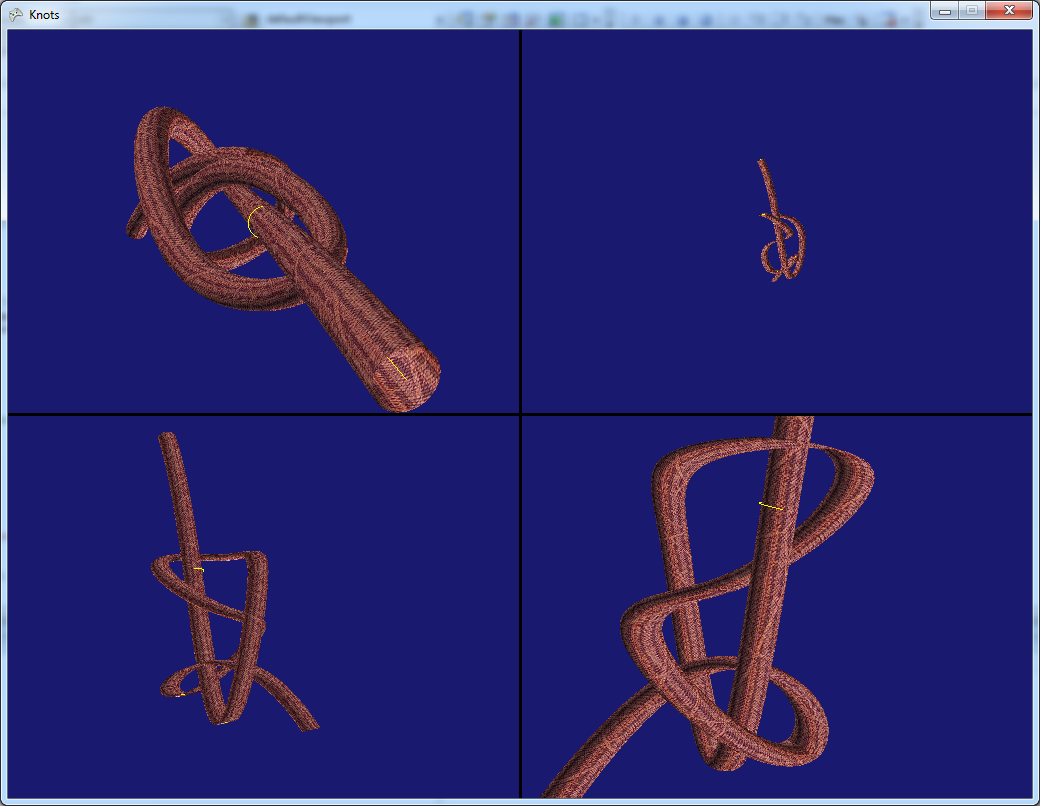
Switch To Four View Windows Using 4 Key: Press 4 key at any time, it will
switch to four view windows with Top, Right, Front and Perspective views.
Activate A View Window Using Left Click: When it's four views, a left click on
any view window will activate this view to be current active working one.
Swith To One View Window Using 1 Key: When it's four views, press 1 key, it
will enlarge the active view window.

Play Knot Animation Using P key: Press P key, the knot engine kernel will play
two kinds of animations showing how the strings of the knot are tied step by
step.

Saturday, March 5, 2011

Diary During Summer Vacation 17

3 hours of work tonight, a snapshot functionality has been added. Besides the ability for unlimited undo and redo, the rendering engine is now able to take snapshots and record those significant steps showing clearly how a knot can be tied. These snapshots are acturally recorded as a list of point list. Each time, a snapshot is taken, the rendering engine copies the current string state which is a set of points, and add it onto the snapshot list. Later when the user wants see or show others how a knot is tied, the animation playing function plays (renders) the snapshots one by one back into the scene.


Diary During Summer Vacation 16

Autumn session is approaching. Only three days left before meeting with group members. I'm working on simplifying and documenting the code. Documentation is something good but is really time consuming as well. Thanks to the advanced IDE Visual Studio, the handy tools to generate and edit class diagrams and those buit-in code completion features has even been expanded to help documentation work. All code in our knot rendering engine has been documented. I will soon draw more class diagrams to make it better.

Diary During Summer Vacation 15

As sometimes we want a knot to be tied around an object, such as a tree or a hook. Downloaded from internet for free, a textured tree model can be put into the scene.

Diary During Summer Vacation 14

5.5 hours of work makes a new feature: Now a second string can be added into a knot. Switch Between Two Strings Of A Knot Using R key: Press R key to activate another string of the knot. It switch to working on this active string and the previous one becomes inactive.


Diary During Summer Vacation 13

Today, two new features have been added:
1) To make a string closed (G key): using method in CubicSpline class that I wrote during last session, a string can actually be closed (Knot_Log13_0.png, Knot_Log13_1.png). Here in our knot rendering engine, press G key is to switch the string from open to closed, and from closed to open as well.

2) To change string radius: The program is now able to change string radius in real-time (- Key to reduce and = Key to enlarge). See Knot_Log13_2.png - Knot_Log13_4.png.


Diary During Summer Vacation 12

Continue with last week's work to add more editing features. Now the X, Y and Z axes can be selected by a left click and when it's seleted it becomes white to indicate its state. Then a drag & drop can move the control point towards the direction of the selected axis - demonstrated by Knot_Log12_0.png and Knot_Log12_1.png.

A feature to Add A New Internal Control Point Uing E key: To add a new control point between two existing control points on the string. Left click to select one control ball, holding on E key, continue to select next control ball using a left click. Two selected balls will become red. Then release the E key, press the E key again, a new control point will be added and a new control ball will be drawn at the position (Knot_Log12_2.png, Knot_Log12_3.png).

Another feature I have added on is to allow user to select an editing ball and then delete this control point. The operation of this one: Delete A Control Point Using D key: When the control balls are visible, a left click on a control ball will select this ball. The ball will become red and the X, Y, Z coordinators will appear on the ball. At this moment, press D key, this selected contorl point will be deleted (Knot_Log12_4.png).


Diary During Summer Vacation 11

This week I worked on adding the editing feature to the knot rendering engine. The first step is to add the ability to show editing balls on the control points on the cubic central line. Press S key is to toggle showing the editing balls. Next, a ball should be able to change its color when being selected. I reckon a world coordinator with X, Y, Z axes should appear as well to smartly response to the user's intention when an editing ball is selected. As shown in the log picture, these two features have been added. It was quite a busy week: Working 9 hours a day, coding, study, attending an English test, feeling exhausted.

Diary During Summer Vacation 10

As discussed with Tim 2 months ago, what I'm trying to do is to finish a running software prototype, that we can say is a 60-70% finished software. The software prototype should already provide all basic functionality to create and edit a knot. The prototype should be well documented as well, so that during the session all other members who are not that familiar with C# or XNA game engine can then do a little coding work according to the documentation. With this in mind, this week I'm continuingly working on the project. Since the integration of windows form and XNA is too time-consuming, I'm thinking of another solution to purely draw our own buttons using XNA framework. I looked into some sample codes and tutorials from XNA game developer's club, feeling confident to do so now.

Diary During Summer Vacation 9

Today I found a bug in the code that is dealing with the 4 view implementation. When doing 2D mouse position to 3D world position unprojection in a view, the code accidentally always takes the perspective camera's view matrix, and hence leads to a wrong unprojection result in other three views. It makes the unprojected 3D points unpredictably goes anywhere. This problem has now been fixed.

Diary During Summer Vacation 8

Continuingly working on the project, I'm faceing big difficulties currently. It turns out that I have to write our own texture and 3D model importer & converter in order to use XNA framework in the Windows form. This work seems quite deep and time consuming. 6 hours of work, no good result:(

Diary During Summer Vacation 7

This week mainly what I did is to add some animation functionality to our program prototype. The program can now play an animation showing how a knot is created step by step. The animation can be played automatically from the first point to last point, or played manually by a user. The second one is actually also a functionality of unlimited operational history of un-do and re-do.

Diary During Summer Vacation 6

This week, pretty much what I did was exploring 2 sample codes of merging Windows form and XNA game engine. The samples are very basic tutorial downloaded from XNA game develop club. Although it's basic idea of how XNA framework can be drawed in window form as a customised Control, it is still a very complex process to merging them. 16 hours have been spent on this stuff that is the important part of our project. Finally, this is the result: I now can draw a simple colored and animated triangle, using XNA Framework, onto our Window form Knot A Problem prototype.

Diary During Summer Vacation 5

A very good progress has been made after a hardworking week: our Knot A Problem program has now got four views including Perspective view, Top view, Right view and Front view. This makes the program much more professional and makes operations on creating knots much eaiser. Each view has its own matrices that allow the view to zoom in, zoom out and pan move of camera. A mouse clike on a view makes the view activated and hence the allow keys etc. can only affect this activated view. Press Key 1 & 4 is to switch the display from one view to 4 view.


Diary During Summer Vacation 4

This week I went to help a friend with building a new house. This friend is very good at 3D programming. During the work we discussed our project, especially the problem with lighting. I used the PositionTexture user difined Class to define and draw the string. This has leaded to a problem that the primitives have no information of the normal of each point so that it's looking like half lit and half dark. I used this PositionTexture class simply because I have not come out the method to calculate the normals for each point. My friend pointed out that I can actually use the central point on the curve to get it done, that is curent_point_on_circle - (minus) central_point is a vector which can be normalised to be exactly the normal of that point. This idea is so good, simple and it works. Now I've used the PositionNormalTexture Class and set up each point to have information about its postion, information of its texture coordinate, and the info of its normal. This change has given us a very nice looking string. It looks so real. I love it. The attached photos show the current effect of a string with different color in a scene.


Diary During Summer Vacation 3

I was working on solving two technical problems: how to get right rotation so that the string will not be stretched; and how to convert a 2D position on the screen to a 3D position in the scene so that the new points added by the user can be as right as what the user expects. Having tried many methods, however the fisrt problem remain unsolved. Regarding the second problem, we already have WorldMatrix, ProjectionMatrix and ViewMatrix. Given only a 2D position, with these there difined matrics there is obviously a whole set of possible 3D positions that I can use. By uising the Unproject() method, passing these matrics as parameters, I now can get exactly the right 3D position. The program is now much more elegant: it is now easy to really add points to form a knot. The first problem is unsolved yet. I would like to go seek help from Casey, the coordinator of CSCI356. I think he would give me some help with matrix calculation in XNA.

Diary During Summer Vacation 2

This week I was working on lighting the scene. It was pretty much just a lot of try and test, not a very technological stuff in XNA. By providing 3 lights: 45 degree front-right main light, 45 degree front-left auxiliary light and 90 degree back auxiliary light (this is the classical lighting method in photography), the strings look stereoscopic and beautiful. Four hours work on it.

Diary During Vacation 1

On Thursday night, I worked on adding Knot A Problem the ability to load and changed textures. I worked based on the demo code that had not yet been lit and textured. This functionality is one of the essetial features of Knot A Problem and is not supposed to be hard to implement. However, because of wrong definition of VertexDeclaration, I could not get it work for 2.5 hours, and had no mean to find where the problem was. In Friday morning, I realised that I could have a check through all the code to see if all user difined primitives match with each other. Then the problem was found in vertexDeclaration: it should be of type VertexPositionTexture. Changing into this, the string was then textured with any texture I provided. Then I also created 4 texture images and loaded them manually. With texture, the string looks very exciting. Now it's ready to add more test code to allow user to change the texture by pressing a pop-out button.